Advanced React Key Points

In this blog, I am going to summarize all the most important points from Advanced React book written by Nadia Makarevich. Themes that I will cover include re-rendering, reconciliation algorithm, Refs, memoization, data fetching, error handling and a few more. Lets get straight to the point.
Re-rendering in React
Let’s start from the beginning: the life of our component and the most important stages of it that we need to care about when we talk about performance. Those are: mounting, unmounting, and re-rendering.
When a component first appears on the screen, we call it mounting. This is when React creates this component’s instance for the first time, initializes its state, runs its hooks, and appends elements to the DOM. The end result — we see whatever we render in this component on the screen.
Then, there is unmounting: this is when React detects that a component is not needed anymore. So it does the final clean-up, destroys this component’s instance and everything associated with it, like the component’s state, and finally removes the DOM element associated with it.
And, finally, re-rendering. This is when React updates an already existing component with some new information. Compared to mounting, re-rendering is lightweight: React just re-uses the already existing instance, runs the hooks, does all the necessary calculations, and updates the existing DOM element with the new attributes. This is what makes react applications ‘dynamic’.
I will focus on re-rendering here, since it affects performance of our app the most. There are basically only 2 triggers for re-render: re-render of parent component and state change in the component or in the components hooks (including store and context value change).
The first one is pretty simple: when parent component re-renders, it triggers the re-render of its children, recursively to the leafs of the component tree. This is why we usually want to move state down as much as possible, so less components need to be re-rendered on each state update.
The second reason is trivial to understand in case you have state declared inside the component. But in the case of hooks or global store, it can be tricky to debug. The hook hides the fact that we have state in our component. But it is still there. Every time it changes, it will trigger re-render of our component, and all of its children. It doesn’t even matter if the state is used in the component directly. If I have a hook changeOnResize which changes its state on resize and returns null, and I call it in my App component:
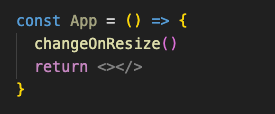
the App will re-render on every resize even if I don’t use the state that’s inside.
There is one thing about re-renders that should be clarified: Components don’t re-render on prop change (unless that prop is from parent and it triggered state update there). If we have local variable isOpen which changes on the click of a button:

ModalDialog component will not re-render when its prop isOpen changes. Although this pattern shouldn’t be used I wanted to point it out for people that are curious.
Children as props
After ‘moving state down’ this is the second pattern so far whose purpose is to reduce the amount of re-renders. Suppose we have a component that has other heavy components inside it:
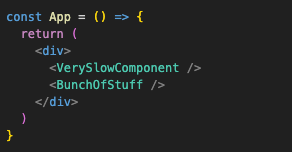
Now we want to attach an event on <div> that changes some state:

This will trigger re-render of all those heavy components inside the div which is far from optimal. But we can’t exactly move state down either, because div wraps everything. The solution in this case comes in the form of props, children as props to be precise. As before, we can extract the div and state in its own component:

And then just pass that slow bunch of stuff to that component as props. Something like this:
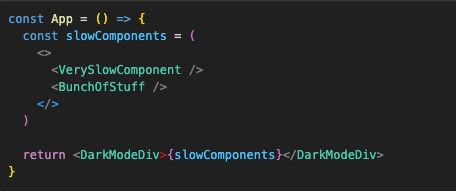
Of course, for this to work we just need to render children prop in the DarkModeDiv template:

This might not make much sense, since we are rendering children inside a component which has state, but when that state changes the children don’t re-render. To make sense of all of this, we need to understand a few things: what we actually mean by “re-render” in React, what the difference is between an Element and a Component, and the basics of the reconciliation algorithm (diffing).
Elements and components
Here is a simple example of an element:

As you can see, its just a function. If it has props, those would be just the first argument of that function. This function returns <Child /> , which is an Element of a Child Component. Every time we use those brackets on a component, we create an Element. The Element of the Parent component would be <Parent /> .
The object definition for our <Child /> element would look something like this:

This tells us that the Parent component, which returns that definition, wants us to render the Child component with no props. The return of the Child component will have its own definitions, and so on, until we reach the end of that chain of components.
Elements can also be normal DOM elements like h1 tag, for example:

In this case, the definition object will be exactly the same and behave the same, only the type will be a string:

Now to re-render. What we usually refer to as “re-render” is React calling those functions and executing everything that needs to be executed in the process (like hooks). From the return of those functions, React builds a tree of those objects. We know it as the Fiber Tree now, or Virtual DOM sometimes. In fact, it’s even two trees: before and after re-render. By comparing (“diffing”) those, React will then extract information that goes to the browser: which DOM elements need to be updated, removed, or added. This is known as the “reconciliation” algorithm.
Reconciliation algorithm
If the object (Element) before and after re-render is exactly the same, then React will skip the re-render of the Component this Element represents and its nested components. And by “exactly the same”, I mean whether Object.is(ElementBeforeRerender, ElementAfterRerender) returns true. React doesn’t perform the deep comparison of objects. If the result of this comparison is true, then React will leave that component in peace and move on to the next one. If the comparison returns false , this is the signal to React that something has changed. It will look at the type then. If the type is the same, then React will re-render this component. If the type changes, then it will remove the “old” component and mount the “new” one.
Let’s take a look at the Parent/Child example again and imagine our Parent has state:

When setState is called, React will know to re-render the Parent component. So it will call the Parent function and compare whatever it returns before and after state changes. And it returns an object that is defined locally to the Parent function. So on every function call (i.e re-render), this object will be re-created, and the result of Object.is on “before” and “after” <Child /> objects will be false. As a result, every time the Parent here re-renders, the Child will also re-render. Which we already know, but it’s nice to have proof of this.
Now, if we change Parent component so instead of rendering Child directly, we would pass it as a prop:

a new <Child /> definition object gets created and passed to Parent as a children prop. One neat advantage of using children prop is that we get to write HTML like syntax instead of regular prop syntax. When the state update in Parent is triggered, React will compare what the Parent function returns “before” and “after” state change. And in this case, it will be a reference to the children: an object that is created outside of the Parent function scope and therefore doesn’t change when it’s called. As a result, the comparison of children “before” and “after” will return true , and React will skip the re-render of this component. Which is exactly what we did for our DarkModeDiv.
Parent will be represented as this object:
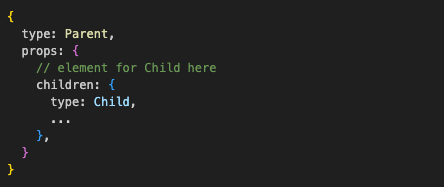
And it will have exactly the same performance benefits as passing Elements as props as well! Whatever is passed through props won’t be affected by the state change of the component that receives those props.
Other use case for element as props
In the previous chapter, we explored how passing elements as props can improve the performance of our apps. However, performance enhancements are not the most common use of this pattern. In fact, they
are more of a nice side effect and relatively unknown. The biggest use case this pattern solves is actually flexibility and configuration of components.
Image we want to have custom ModalDialog component which has a content and a footer, and in the footer we would want different kinds of buttons depending on the use case. One solution would be to hard code buttons in the ModalDialog and configure them through props, but that would make a mess of our code. A better solution would be to create a footer prop on the dialog

and then pass whatever is needed in the place we use it:

This makes ModalDialog much less clogged and more flexible, although sometimes having component that is too flexible is not the desired solution.
Essentially, an element as a prop for a component is a way to tell the consumer: give me whatever you want, I don’t know or care what it is, I am just responsible for putting it in the right place. The rest is up to you.
Of course, all of this applies to the special “children” prop as well, with the added benefit of using special “nested” syntax. A good use case for it would be something like a “main” part of the component, in this case the content.
Conditional rendering
Imagine we render a component that accepts element as props conditionally:

Here, a footer is an Element which we declare, and from Reacts perspective, its just an objects that sits in memory and does nothing. It does not render until isDialogOpen becomes true and it ends up in the return object of ModalDialog component.
This is what makes routing patterns, like in one of the versions of React router, completely safe:

Here, the App does not render Page and OtherPage. They are just declared, and rendered only when the path in one of the routes matches the URL and the element prop is actually returned from the Route component.
useMemo, useCallback and React.memo
When React compiler becomes widely used, these patterns will become a thing of the past and we won’t have to scratch our head as to why our memo isn’t doing anything. But until then we should know how these things work as in some cases they can improve the performance of our app if used properly.
useEffect hook is used to conditionally perform some code after re-renders if the dependencies have changed. For example:
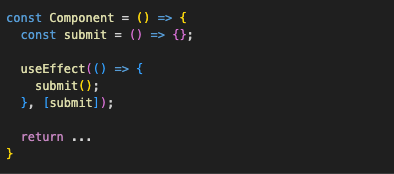
In this example, submit is declared outside of useEffect hook, so it should be declared as a dependency. But since submit is declared locally inside Component, it will be re-created every time Component re-renders, so each time it will be different, and useEffect will be triggered each time, which is not what we want.
When we want to preserve reference to the function between re-renders, we use useCallback. If we wrap submit in useCallback:

then the value in the submit variable will be the same reference between re-renders, the comparison will return true, and the useEffect hook that depends on it won’t be triggered every time.
useMemo is called at the top level of your component to cache a calculation between re-renders:

React caches the very first function that is passed as an argument to useCallback and then just returns it every time if the dependencies of the hook haven’t changed. And if dependencies have changed, it updates the cache and returns the refreshed function. With useMemo, it’s pretty much the same, only instead of returning the function, React calls it and returns the result. Regardless, both of these have very similar performance.
Now onto React.memo. React.memo or just memo is used to memoize the component itself. If a components’ re-render is triggered by its parent, and if this component is wrapped in React.memo, then and only then will React stop and check its props. If none of the props change, then the component will not be re-rendered, and the normal chain of re-renders will be stopped. If even one prop changes, the component will re-render as usual. We need to be careful when using reference type props here, such as functions and objects, since they will be recreated on every render (this includes children as props). If that is the case, we need to wrap all of them in useCallback or useMemo, so that they only change if dependencies inside them change.

This behavior can change though, if we use the second argument in React.memo, which is comparison function. It gives us more granular control over props comparison. If it returns true, then React will know that props are the same, and the component shouldn’t be re-rendered.

Reconciliation and diffing in depth
If we have our Input component defined like this:

from Reacts perspective, it would be an array of objects:

DOM elements like input or label will have their “type” as strings, and React will know to convert them to the DOM elements directly. But if we’re rendering React components, they are not directly correlated with DOM elements, so React needs to work around that somehow.

In this case, it will put the component’s function as the “type.” It just grabs the entire function that we know as the Input component and puts it there:

And then, when React gets a command to mount the app (initial render), it iterates over that tree and does the following:
- If the “type” is a string, it generates the HTML element of that type.
- If the “type” is a function (i.e., our component), it calls it and iterates over the tree that this function returned.
Until it eventually gets the entire tree of DOM nodes that are ready to be shown. A component like this, for example:

Will be represented as:
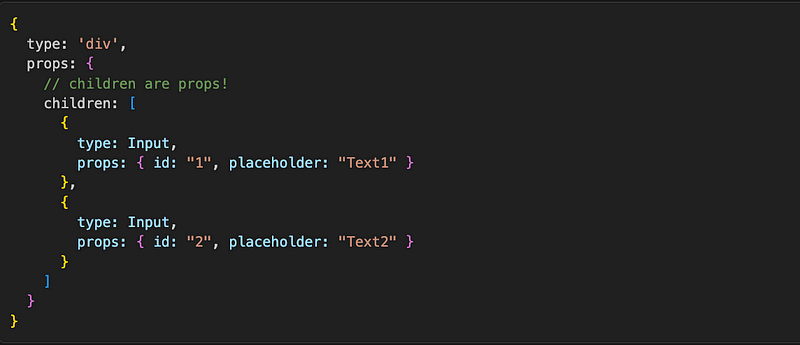
Which will on mounting resolve into HTML like this:

Finally, when everything is ready, React appends those DOM elements to the actual document with JavaScript’s appendChild command.
Lets have a look at an example. Suppose we have a component that conditionally renders input 1 or 2:
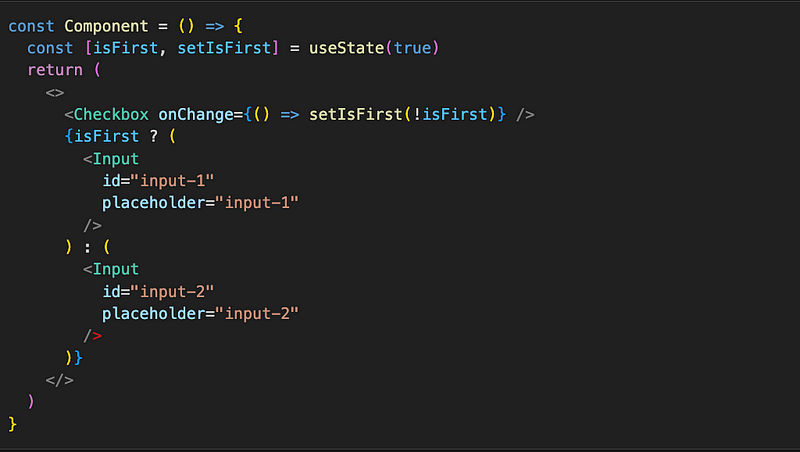
What will happen when we click the checkbox and isFirst becomes false? State change will trigger re-render of Component, which from Reacts’ perspective is an array of objects that before re-render looks like this:
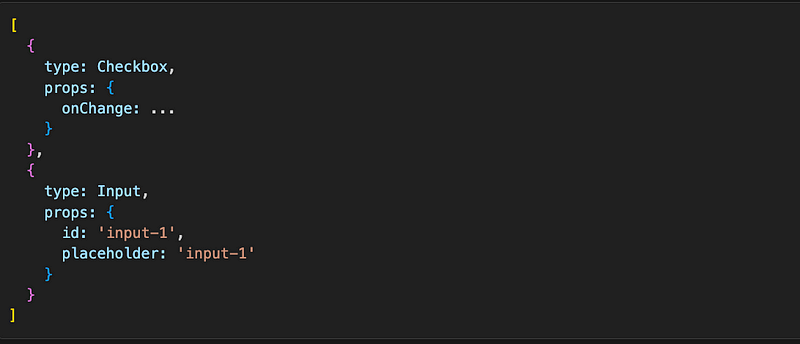
React compares this array to the array after re-render, which looks like this:
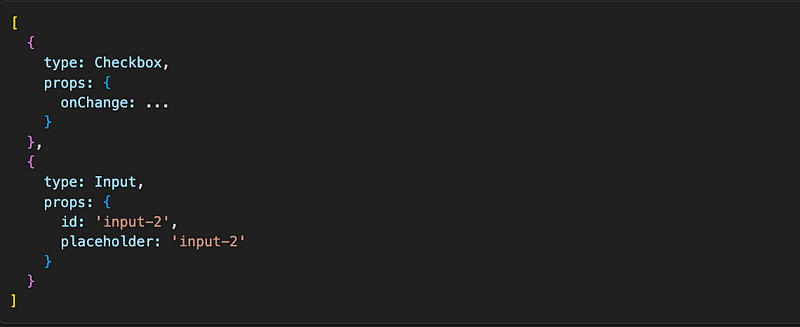
It compares each element of the array one by one, and looks at the type property. If type is the same (and there is no key attribute), React will re-render that element with new data. If type has changed React unmounts that element and mounts the new one. In our case the type for both Checkbox and Input is the same (just a reference to the function), so React will only re-render them. The consequence of this is that if we start writing something in input-1, and then click on checkbox, input-2 will be rendered but the text from the old input will still be there.
If this isn’t our desired behavior and we want to destroy inputs and their data between swaps, there are 2 ways to achieve that: arrays and keys.
The first one is pretty simple now that we know how the reconciliation works: we just need to have separate array elements for each of the two inputs, which we achieve by having two conditional renders and rendering null if the condition is not met:

Now the Component array before and after state change looks like this:

The algorithm will compare the first Input with null, and since the type is not the same, it will unmount it, and its data will be lost. It will do the comparison for second Input, which will be freshly mounted.
Second way of solving the same problem is the special “key” attribute. It is used in situations where we have multiple components of the same type in a row, to help React identify which one is which. In that case during re-render, React will re-use the existing elements, with all their associated state and DOM, if the “key” and “type” match “before” and “after”, regardless of their position in the array. So if we have two inputs, and on a click of a button we add new input to the beginning, React will just add a new input to the beginning of the array and shift our two inputs one place down and keep their state.
Before:

After:

So basically React uses keys to identify which elements existed before re-render, so it can re-use them instead of re-mounting them which is a lot slower, even if they change their position in the elements array.
If we apply this knowledge to our situation from before, and give unique keys to each of the two inputs:
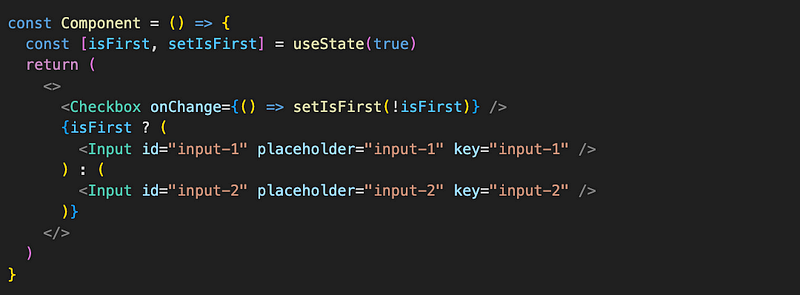
Now, when the state changes from true to false, the algorithm compares the types. They will be the same, but now we also have “key” attribute on each Input, which are different, signaling to React that it needs to unmount the first one and mount the second. With “key” attribute, we told React that our Inputs are different and should not be reused. This technique is known as “state reset”.
If we combine these approaches, something very interesting will happen. When we go back to having three elements in the Component array and add the same key to two Inputs:

and then change isFirst from true to false, from data and re-renders’ perspective, it will now be like this.
Before, isFirst is true:

After, isFirst is false:

React sees an array of children and sees that before and after re-render, there is an element with the Input type and the same “key.” So it will think that the Input component just changed its position in the array and will re-use the already created instance for it. If we type something, the state is preserved even though the Inputs are technically different. This behavior can be used for fine tuning components like accordions, tabs content, or some galleries.
One last thing to point out before moving to the next section. Suppose we have a list of dynamically rendered inputs, and below them one static input, like this:

Will the Input with the id=”3” be re-mounted when we add or remove an element from data array? If array representation of Component looks like this:

then this will certainly be the case, which is pretty bad for our performance. Luckily, React is smarter than that. When we mix dynamic and static elements, like in the code above, React simply creates an array of those dynamic elements and makes that entire array the very first child in the children’s array. This is going to be the definition object for that code:

Our manual Input will always have the second position here. There
will be no re-mounting. No performance disaster.
Refs
A Ref is a mutable object that React preserves between re-renders. To create a Ref, we can use the useRef hook with the Ref’s initial value passed to it:

That initial value will now be available via the ref.current property:
everything that we pass to the Ref is stored there. The initial value is cached, so if we compare ref.current between re-renders, the reference will be the same. It’s the same as if we’d just used the useMemo hook on that object.
Main difference between Refs and state is that ref change doesn’t trigger a re-render of a component. Second difference is that Ref changes are synchronous, while state change is asynchronous. State updates are run in “snapshots” and React makes sure that the data within one “snapshot” is consistent. If we have a value state which is updated from string “before” to “after” after clicking a button and we log value state in the onClick function, we would see the same log twice.

When we call setValue function, we’re not updating the state right away. We’re just letting React know that it needs to schedule a state update with the new data after it’s done with whatever it’s doing now. With Ref, we would get two different logs, “before” and “after”.
It’s okay to use Refs if that value isn’t used for rendering components, and if it’s not passed as props to other components. The most important and popular use case for Refs is assigning DOM elements to them. We can do this as simply as creating a Ref with the useRef hook and then passing that Ref to a DOM element via the ref attribute:

Now we have the same access to the input as we would have with getElementById, in ref.current value. This will of course happen after the element is created, so we can’t do stuff like

We should only use ref.current in useEffect or in callbacks.
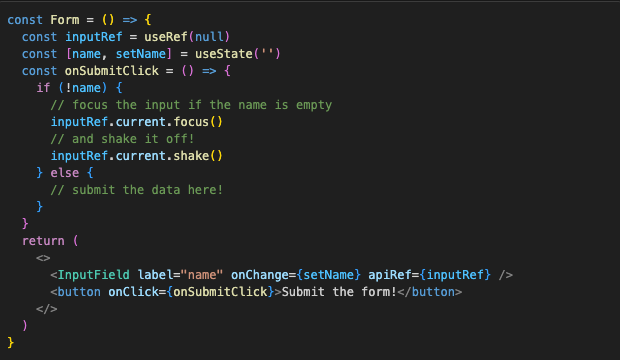
One cool thing we can do with Refs is expose components’ public API. If we have InputField in a Form, and we want to have the ability to focus and shake that InputField, we can make a Ref in parent component and pass it down to InputField, and just attach focus and shake functions to its current property:
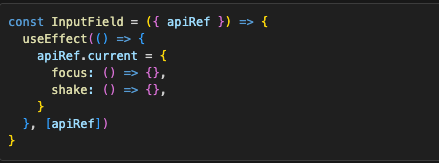
Then we can use them in the parent, without exposing internal implementation details.
Closures
Imagine you’re implementing a form with a few input fields. One of the fields is a very heavy component from some external library. You don’t have access to its internals, so you can’t fix its performance problems. But you really need it in your form, so you decide to wrap it in React.memo, to minimize its re-renders when the state in your form changes. But that component also takes two props: title and onClick callback which is triggered when you click “done” button inside that component.
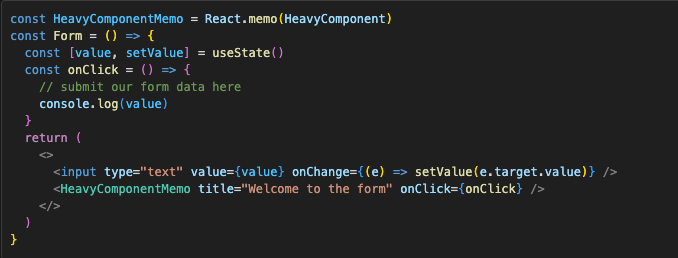
onClick is a function that should submit the data from inputs, and needs to be persistent between re-renders so our React.memo actually makes sense. And since onClick is dependent on value, wrapping it in useCallback would be useless since value changes on each keystroke. To solve this problem, we can use comparison function in React.memo, to compare only the title before and after:

Now when we type something in the input, the heavy component doesn’t re-render, and performance doesn’t suffer. Except for one problem: value inside onClick is undefined on each click. If we log value outside of onClick it works properly, just not inside of it. Why is that?
This is known as the “stale closure” problem. When we create a function, it has access to all variables from its scope and outer scopes. This is achieved by creating a closure. The function inside “closes” over all the data from the outside. You can imagine a function having a backpack and putting all the variables it “sees” in that backpack at the time of its creation. It can access those variables at any later point in time.
In React, we’re creating closures all the time without even realizing it. Every single callback function declared inside a component is a closure.

Everything in useEffect or useCallback hook is a closure:

All of them will have access to state, props, and local variables declared in the component. Every single function inside a component is a closure since a component itself is just a function.
Back to “stale closure”. Every closure is frozen at the point when it’s created. In our example, a stale closure is created when we create onClick function, with the default state value, undefined. We pass that closure to our memoized component, along with the title prop. Inside the comparison function, we compare only the title. It never changes, it’s just a string. The comparison function always returns true, HeavyComponent is never updated, and as a result, it holds the reference to the very first onClick closure, with the frozen “undefined” value.
We can escape closure trap with Refs. Let’s get rid of the comparison function in our React.memo and onClick implementation for now. Just a pure component with state and memoized HeavyComponent :

Now we need to add an onClick function that is stable between re-renders but also has access to the latest state without re-creating itself.
We’re going to store it in Ref, so let’s add it. Empty for now:

In order for the function to have access to the latest state, it needs to be re-created with every re-render. There is no getting away from it, it’s the nature of closures, nothing to do with React. We’re supposed to modify Refs inside useEffect, not directly in render, so let’s do that.
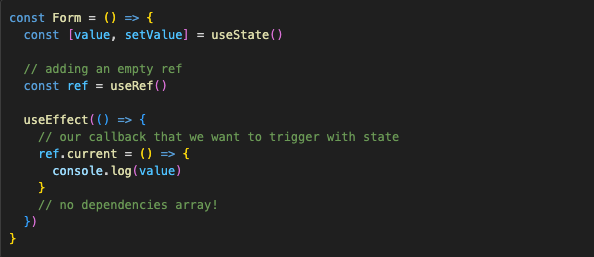
useEffect without the dependency array will be triggered on every re-render. Which is exactly what we want. So now in our ref.current we have a closure that is recreated with every re-render, so the state that is logged there is always the latest.
But we can’t just pass that ref.current to the memoized component. That value will differ with every re-render, so memoization just won’t work.

So instead, let’s create a small empty function wrapped in useCallback with no dependencies for that.
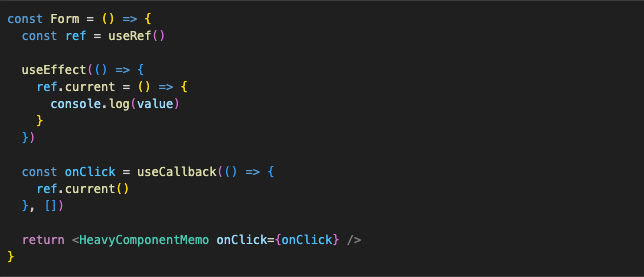
Notice how ref is not in the dependencies of the useCallback? It doesn’t need to be. ref by itself never changes. It’s just a reference to a mutable object that the useRef hook returns. And our closure only freezes the reference to that object. The object itself can be updated with the newest state value. The full code looks like this:
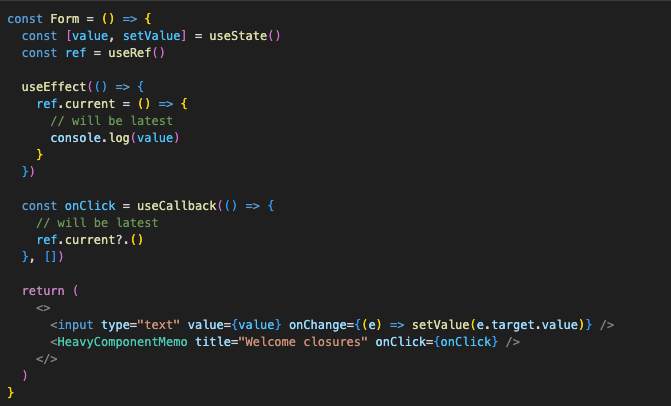
Now, we have the best of both worlds: the heavy component is properly memoized and doesn’t re-render with every state change. And the onClick callback on it has access to the latest data in the component without ruining memoization. We can safely send everything we need to the backend now!
useLayoutEffect
useLayoutEffect is a hook React provides, similar to useEffect, only it runs synchronously. It can be useful when we have to render certain elements on the screen only to get their widths for example, and then immediately remove some of them that don’t fit. In case of useEffect, we would have flickering, because browser would paint those elements first, and then remove them and repaint the screen. If we use useLayoutEffect, everything inside it will be considered the same task, and we won’t have that flickering effect. This picture illustrates nicely the difference between useLayoutEffect and useEffect.


It should be used with caution though, as the last thing we need is for our entire React app to turn into one giant synchronous “task”. Use useLayoutEffect only when you need to get rid of the visual “glitches” caused by the need to adjust the UI according to the real sizes of elements. For everything else, useEffect is the way to go.
In Next.js and other SSR frameworks, this doesn’t work. When we have SSR enabled, the very first pass at rendering React components and calling all the lifecycle events is done on the server before the code reaches the browser. It means that somewhere on the backend, some method calls something like React.renderToString(<App />). React then goes through all the components in the app, “renders” them (i.e., just calls their functions), and produces the HTML that these components represent.
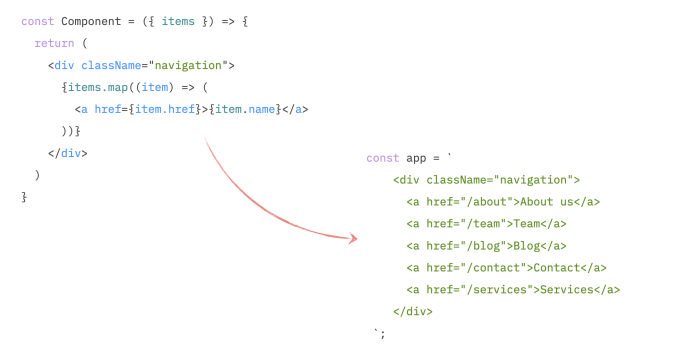
Then, this HTML is injected into the page that is going to be sent to the browser. After that, the browser downloads the page, shows it to us, downloads all the scripts (including React), runs them (including React again), React goes through that pre-generated HTML, sprinkles some interactivity on it, and our page is now alive again.
The problem here is: there is no browser yet when we generate that initial HTML. So anything that would involve calculating actual sizes of elements (like we do in our useLayoutEffect) will simply not work on the server: there are no elements with dimensions yet, just strings. And since the whole purpose of useLayoutEffect is to get access to the element’s sizes, there is not much point in running it on the server. And React doesn’t.
As a result, what we see during the very first load when the browser shows us the page that is not interactive yet is what we rendered during the “first pass” stage in our component. After the browser has a chance to execute everything and React comes alive, it finally can run useLayoutEffect, and the elements are finally hidden. But the visual glitch is there.
How to fix it is a user experience problem and depends entirely on what you’re willing to show to your users “by default.” We could show them some “loading” state, or one or two of the most important items. Or even hide the items completely and only render them on the client. It’s up to you.
React portals
Portals allows us to render some elements outside of their current DOM position, so that the Stacking Context doesn’t trap them. This is most useful for modals. To create a portal, we can use the createPortal function that React gives us. Well, technically, the react-dom library, but it only matters for the import path in our case. It accepts two arguments:
- What we want to teleport in the form of React Element (<ModalDialog /> for example)
- Where we want to teleport it to in the form of a DOM element. Not an id, but the element itself! We would have to refresh our rusty JavaScript skills for this and write something like document.getElementById(“root”).

That’s it, the Context trap is no more! We still “render” the dialog together with the button from our developer experience perspective. But it ends up inside the element with id=”root”.
Data fetching on the client and performance
There are two types of data fetching: initial data fetching and data fetching on demand. Data on demand is something that you fetch after a user interacts with a page in order to update their experience. Initial data is the data you’d expect to see on a page right away when you open it. Initial data fetching is usually the most crucial for the majority of people. During this stage, the first impression of your app as “slow as hell” or “blazing fast” will form. That’s why the rest of the chapter will focus solely on initial data fetching and how to do it properly with performance in mind.
Here is one interesting fact. Did you know that browsers have a limit on how many requests in parallel to the same host they can handle? Assuming the server is HTTP1 (which is still 70% of the internet), the number is not that big. In Chrome, it’s just 6. 6 requests in parallel! If you fire more at the same time, all the rest of them will have to queue and wait for the first available “slot”.
Lets say that we have a fetch in our App component. Assume that the fetch request is super fast, taking just ~50ms. If I add just six requests before that app that take 10 seconds, without waiting for them or resolving them, the whole app load will take those 10 seconds in Chrome. Which is why we need to be careful when firing our requests.
Now to something more practical. We have the App component, which will render Sidebar and Issue, and Issue will render Comments.
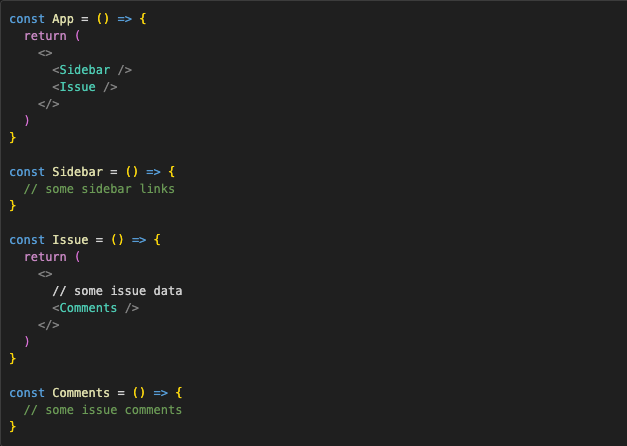
Now to the data fetching. Let’s first extract the actual fetch and useEffect and state management into a nice hook to simplify the example.

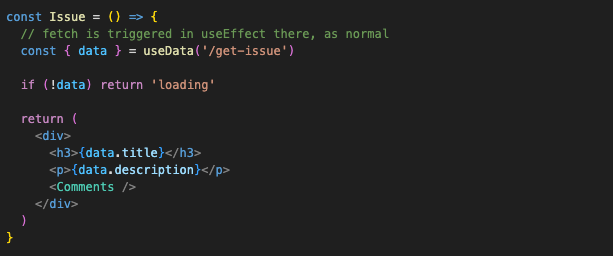
Then, I would probably naturally want to co-locate fetching requests with the large components: issue data in Issue and comments list in Comments. And would want to show the loading state while we’re
waiting, of course!

And exactly the same code for Issue, only it will render the Comments component after loading:
And the app itself:
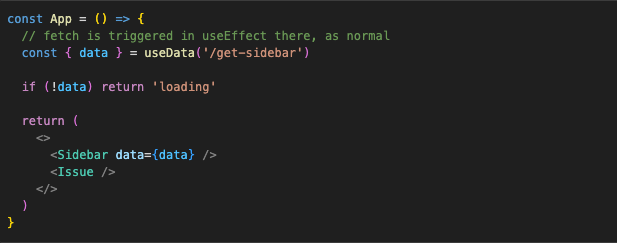
And thats it. This works, but the app is terribly slow. What we did here is implement a classic waterfall of requests. Only components that are actually returned will be mounted, rendered, and as a result, will trigger useEffect and data fetching in it. In our case, every single component returns a “loading” state while it waits for data. And only when data is loaded does it switch to a component next in the render tree, triggers its own data fetching, returns a “loading” state, and the cycle repeats itself.

Waterfalls like that are not the best solution when you need to show the app as quickly as possible. Luckily, there are a few ways to deal with them.
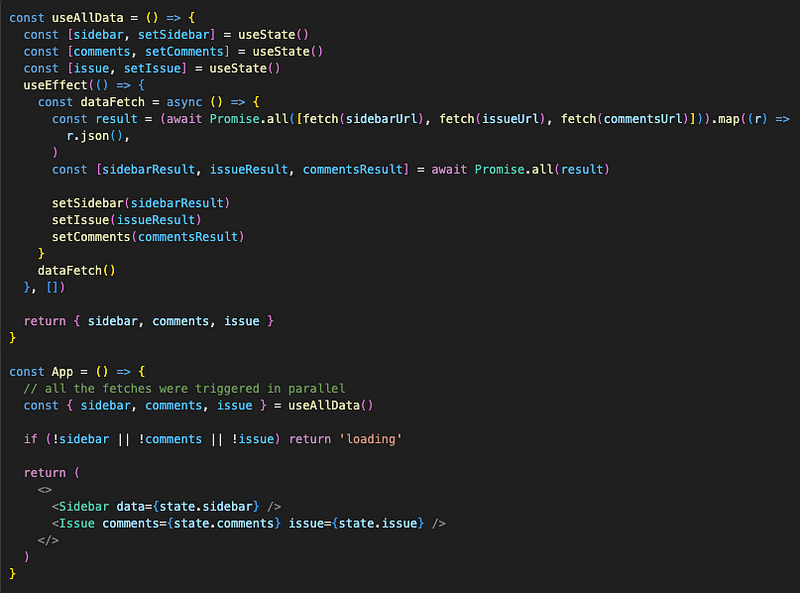
We can solve a waterfall by using Promise.all:

and then save all of them to state in the parent component and pass them down to the children components as props:
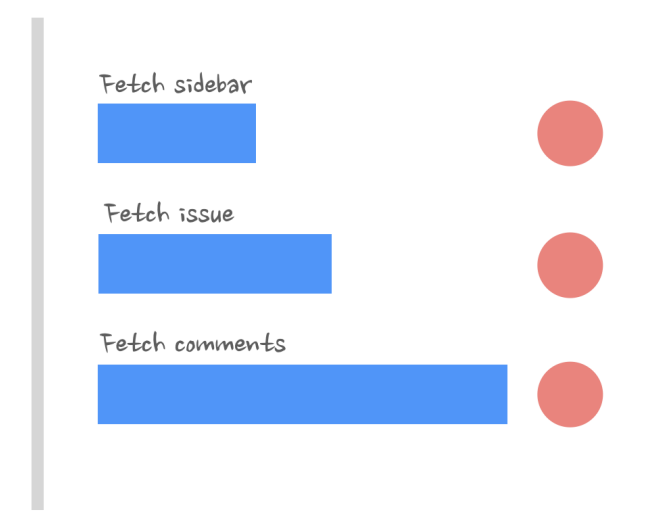
The graph for fetch requests looks like this:
Lifting data loading up like in the examples above, although good for performance, is terrible for app architecture and code readability. Fortunately, there is a better solution to this: we can introduce the
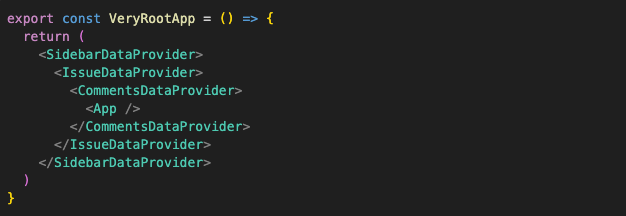
concept of “data providers” to the app. “Data provider” here would be just an abstraction around data fetching that gives us the ability to fetch data in one place of the app and access that data in another, bypassing all components in between. In “raw” React, it’s just a simple context:
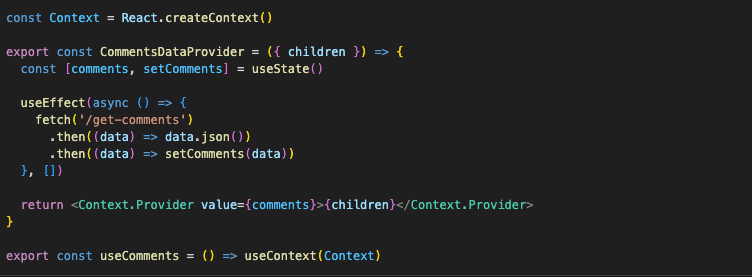
Exactly the same logic for all three of our requests. And then our App component turns into something as simple as this:
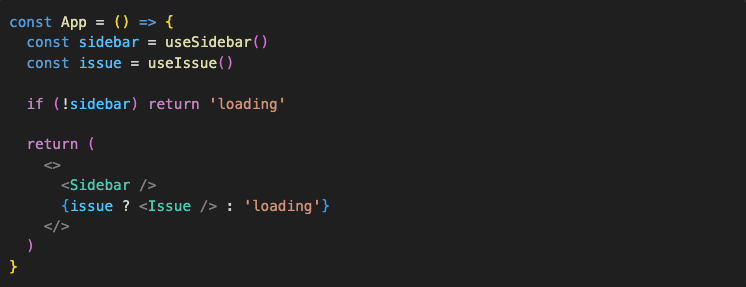
Our three providers will wrap the App component and will fire fetching requests as soon as they are mounted in parallel:
And then in something like Comments (i.e., far, far deep into the render tree from the root app), we’ll just access that data from “data provider”:

If you’re not a fan of Context, the same concept will work with any state management solution of your choosing.
There is another feature that needs to be mentioned here, and that is Suspense. Suspense is used in opinionated frameworks like Next.js to help us with the loading states. Instead of this:

we’re going to lift that loading state up and do this:

Everything else, like browser limitations, React lifecycle, and the nature of request waterfalls, stays the same.
Data fetching and race conditions
Lets say we have an app that has a tabs column on the left, navigating between tabs sends a fetch request, and the data from the request is rendered on the right. It has the root App component, which manages the state of the active “page” and renders the navigation buttons and the actual Page component.

The Page component accepts the id of the active page as a prop, sends a fetch request to get the data, and then renders it. The simplified implementation (without the loading state) looks like this:
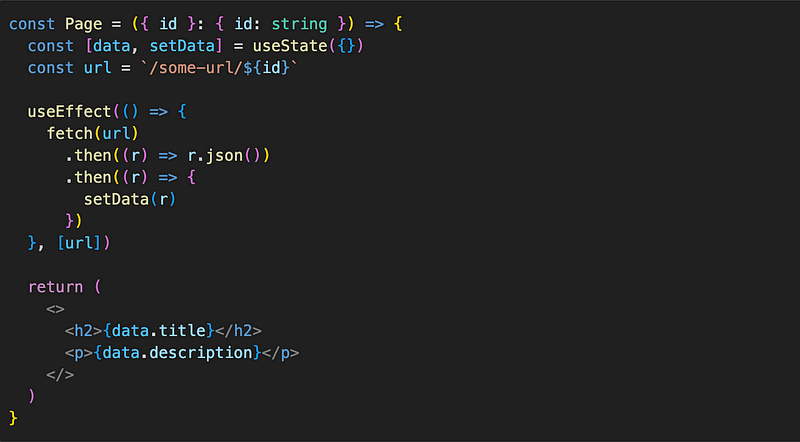
Lets analyze what happens when we open the app and click on the second button. First the App renders, with the default value of page set to ‘1’. Then Page component renders with the id = 1, and then the useEffect inside it is triggered, causing first fetch. But since we clicked on the second button after the App finished rendering, we triggered state update in App, causing it to re-render, which causes Page to re-render with the value of id = 2, which causes the second fetch to be triggered. What we see is a flash of content: the content from the first finished fetch is rendered, then it’s replaced by the content from the second finished fetch — race condition.
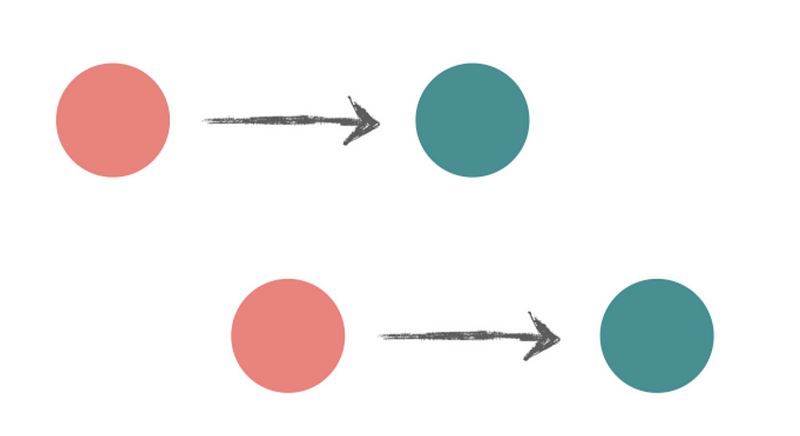
This effect is even more interesting if the second fetch finishes before the first fetch. Then we’ll see the correct content of the next page first, and then it will be replaced by the incorrect content of the previous page.
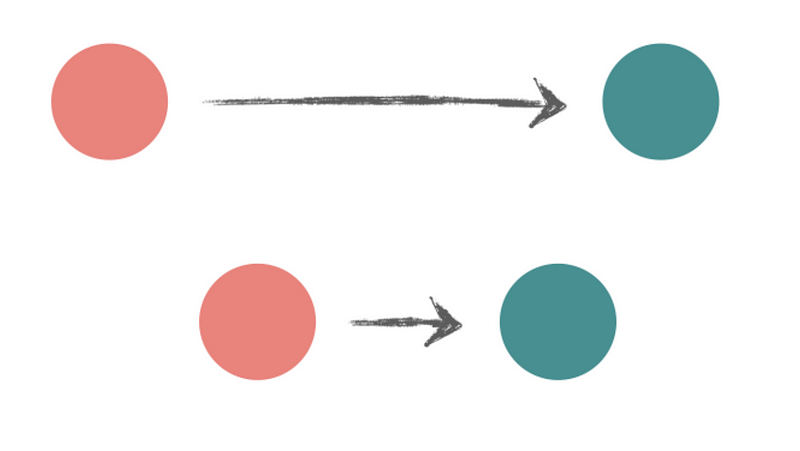
The first solution is to have two separate components for our two pages: Issue and About.

No passing down props, Issue and About components have their own unique URLs from which they fetch the data. And the data fetching happens in the useEffect hook, exactly the same as before. This time there is no race condition in the app while navigating, because Issue and About are re-mounted instead of re-rendered each time we navigate. What is happening from the fetching perspective is this:
- The App component renders first, mounts the Issue component, data fetching there kicks in.
- When I navigate to the next page while the fetch is still in progress, the App component unmounts the Issue page and mounts the About component instead, and kicks off its own data fetching.
When the Issue‘s fetch request finishes while I’m on the About page, the .then callback of the Issue component will try to call its setIssue function. But the component is gone. From React’s perspective, it doesn’t exist anymore. So the promise will just die out, and the data it got will just disappear into the void.
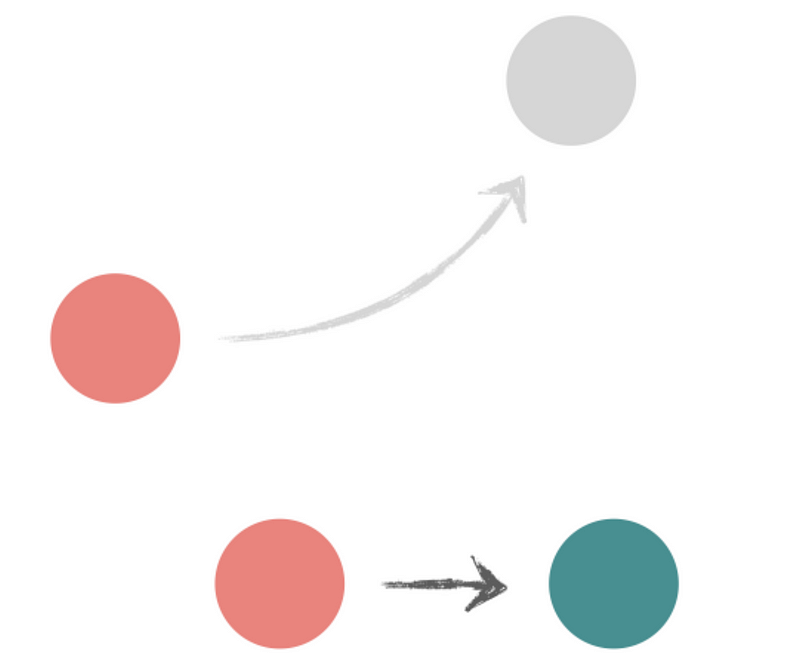
We can also solve the race condition without changing the code from the first example, if we force Page component to re-mount each time page state changes — by adding key attribute to it.

However, this is not a solution I would recommend for the general race conditions problem. There are too many caveats: performance might suffer, unexpected bugs with focus and state, unexpected triggering of useEffect down the render tree. It’s more like sweeping the problem under the rug. There are better ways to deal with race conditions. But it can be a tool in your arsenal in certain cases if used carefully.
A much gentler way to solve race conditions, instead of nuking the entire Page component from existence, is just to make sure that the result coming in the .then callback matches the id that is currently “active”.
If the result returns the id that was used to generate the url , we can just compare them. And if they don’t match, ignore them. The trick here is to escape the React lifecycle and locally scoped data in functions and get access to the “latest” id inside all iterations of useEffect, even the “stale” ones. Another use case for Refs.
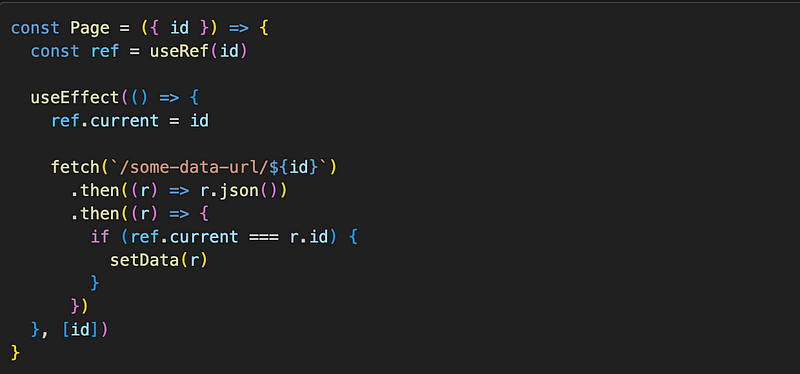
If your results don’t return anything that identifies them reliably, we can just compare the url instead.
If you don’t like there solutions, there is another one. We can use useEffect’s “cleanup” function, where we can clean up stuff like subscriptions. Or in our case, it’s active fetch requests.
The cleanup function is run after a component is unmounted, or before every re-render with changed dependencies. So the order of operations during re-render will look like this:
- url changes
- “cleanup” function is triggered
- actual content of useEffect is triggered
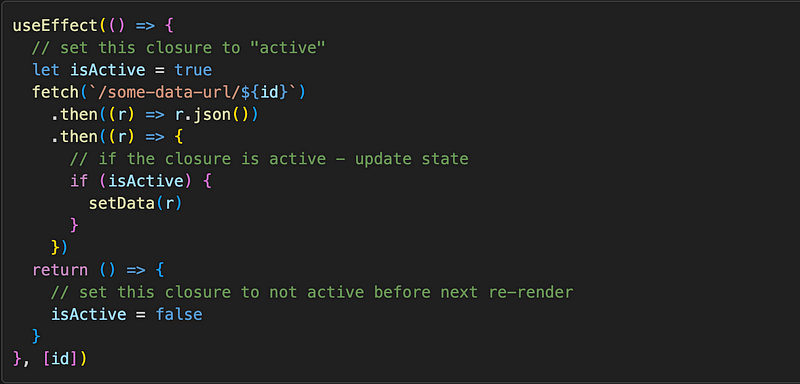
We’re introducing a local boolean variable isActive and setting it to true on useEffect run and to false on cleanup. The function in useEffect is re-created on every re-render, so the isActive for the latest useEffect run will always reset to true. But! The “cleanup” function, which runs before it, still has access to the scope of the previous function, and it will reset it to false. This is how JavaScript closures work.
The fetch Promise, although async, still exists only within that closure and has access only to the local variables of the useEffect run that started it. So when we check the isActive boolean in the .then callback, only the latest run, the one that hasn’t been cleaned up yet, will have the variable set to true. So all we need now is to check whether we’re in the active closure, and if yes — set state. If not — do nothing. The data will simply disappear into the void again.
Universal error handling in React
It’s important to have some error-catching solution in our React apps, since from version 16, an error thrown during the React lifecycle will cause the entire app to unmount itself if not stopped. In Javascript we can catch errors with try/catch statement, but it has many caveats when using with React hooks and state which I won’t go over here. The better solution for error handling is React’s ErrorBoundary component.
It’s a special API that turns a regular component into a try/catch statement in a way, only for React declarative code. Typical usage that you can see in every example, including the React docs, will be something like this:

Now, if something goes wrong in any of those components or their children during render, the error will be caught and dealt with.
But React doesn’t give us the component per se, it just gives us a tool to implement it. The simplest implementation would look something like this:
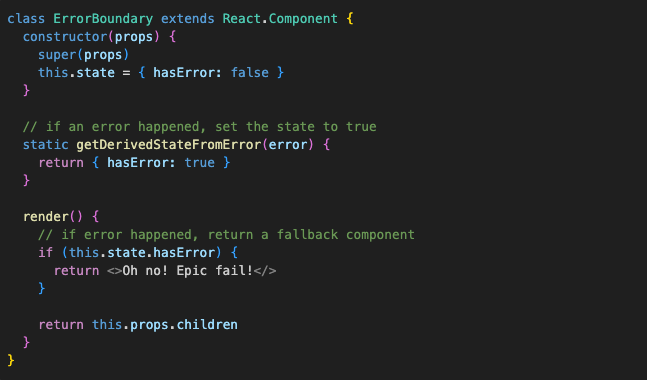
We create a regular class component (going old-school here, no hooks for error boundaries available) and implement the getDerivedStateFromError method — this turns the component into a proper error boundary.
Another important thing to do when dealing with errors is to send the error info somewhere where it can wake up everyone who’s on-call. For this, error boundaries give us the componentDidCatch method:

After the error boundary is set up, we can do whatever we want with it, same as any other component. We can, for example, make it more reusable and pass the fallback as a prop:

And use it like this:

There is one problem with this though — it doesn’t catch everything. Error boundaries only catch errors that happen during the React lifecycle. Things that happen outside of it, like resolved promises, async code with setTimeout, various callbacks, and event handlers, will disappear if not dealt with explicitly.
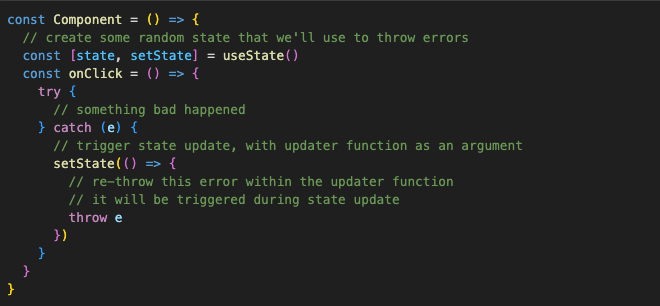
Fortunately, there is a trick we can use to enable ErrorBoundary to catch all errors. The trick is to catch those errors first with try/catch. Then inside the catch statement, trigger a normal React re-render, and then re-throw those errors back into the re-render lifecycle. That way, ErrorBoundary can catch them like any other error. And since a state update is the way to trigger a re-render, and the state set function can actually accept an updater function as an argument, we can do this:
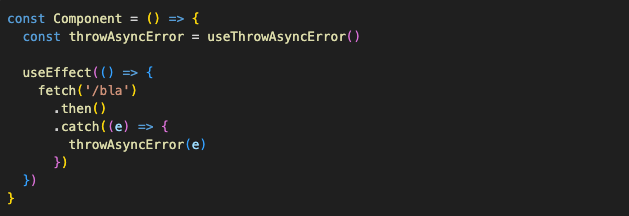
The final step here would be to abstract this hack away so we don’t have to create random states in every component. We can get creative here and make a hook that gives us an async error thrower:

And use it like this:
There is a nice library called “react-error-boundary” that implements a flexible ErrorBoundary component and has a few useful utils similar to those described above. Whether to use it or not is just a matter of personal preferences, coding style, and unique situations within your components.
That’s it! I hope you have enjoyed it and learned something new. Almost all examples are taken from Nadia’s book: Advanced React Book. Happy coding!


0 comments